 |
|
|
Creating Dimensions
Many different dimension types are created with the Dimension tool. To create a dimension, select item(s) to be dimensioned and then middle-click to locate the dimension value |
|
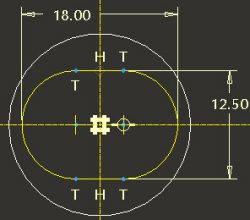
| Task 2-9. Complete the oval-shaped sketch by creating dimensions. |
- Click Dimension
 from the sketcher toolbar (right of the screen). from the sketcher toolbar (right of the screen).
- Select the first arc, then select the second arc
- Position the cursor above the sketch, and middle-click to place the dimension.
- Select Horiz from the Dim Orientation dialog box that appears and click Accept.
- With Dimension still depressed, select the top and then the bottom lines.
- Position the cursor to the right of the sketch, and middle-click to place the dimension.
- Middle-click to stop sketching and to allow items to be selected.
(Notice that Select Items  is now depressed.) is now depressed.)
- Double-click on the horizontal dimension, type 18, and press ENTER.
- Double-click on the vertical dimension, type 12.5, and press ENTER.
|
Creating Dimensions |
- Click Complete Sketch
 from the sketcher toolbar. from the sketcher toolbar.
- Click Saved View List
 from the main toolbar and select Standard Orientation. from the main toolbar and select Standard Orientation.
- Click Datum Planes
 from the main toolbar to enable their display. from the main toolbar to enable their display.
- Click Shading
 from the main toolbar. from the main toolbar. |
