| Task 2-17. Complete the sketch and create a symmetric Extrude. |
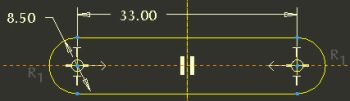
- Dimension the sketch as shown in the following figure:
- Click Dimension
 from the sketcher toolbar. from the sketcher toolbar.
- Select the center of each arc and middle-click above the sketch to place the horizontal dimension.
- Double-click the left arc and then middle-click to the left of the sketch to place the diameter dimension.
- Middle-click to stop sketching and to allow items to be selected.
- Double-click on the diameter dimension, type 8.5, and press ENTER.
- Double-click on the length dimension, type 33, and press ENTER.
Creating and Modifying Dimensions |
- Click Complete Sketch
 from the sketcher toolbar. from the sketcher toolbar.
- Click Saved View List
 from the main toolbar and select Standard Orientation. from the main toolbar and select Standard Orientation.
- Click Datum Planes
 from the main toolbar to enable their display. from the main toolbar to enable their display.
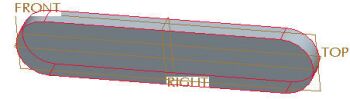
- With the sketch still selected, create an Extrude feature as shown in the following figure:
- Start the Extrude Tool
 from the feature toolbar. from the feature toolbar.
- Click the black arrow on the Depth Options Flyout
 in the dashboard and select Both Sides in the dashboard and select Both Sides  . .
- Drag the depth handle to 3.
- Click Complete Feature
 from the dashboard. from the dashboard.
Extrude Completed | |