 |
|
|
Creating the PISTON
The PISTON also starts off using a circular sketch, but it is placed on a different plane. |
|
| Task 2-4. Create the PISTON.PRT, and create the first Sketch. |
- Click New
 from the main toolbar and select Part as the Type. from the main toolbar and select Part as the Type.
- Type PISTON as the Name and press ENTER.
- A new part model is created from the default template.
- Start the Sketch Tool
 from the feature toolbar (right of the screen). from the feature toolbar (right of the screen).
- Select datum plane TOP from the model,
- Click Sketch from the Sketch dialog box.
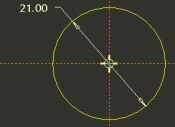
- Sketch a circle as shown in the following figure:
- Click Datum Planes
 from the main toolbar (top of the screen) to disable their display. from the main toolbar (top of the screen) to disable their display.
- Click Circle
 from the sketcher toolbar (right of the screen). from the sketcher toolbar (right of the screen).
- Click and release to place the circle center, move the mouse outward, then click and release again.
- Click Select Items
 from the sketcher toolbar to allow items to be selected. from the sketcher toolbar to allow items to be selected.
- Double-click the diameter dimension, type 21, and press ENTER.
Creating a Sketch |
- Click Complete Sketch
 from the sketcher toolbar. from the sketcher toolbar.
- Click Saved View List
 from the main toolbar and select Standard Orientation. from the main toolbar and select Standard Orientation.
- Click Datum Planes from the main toolbar to enable their display.
|
